 SAManualGoTo v. 3.3 by P.L. Fabbri ( pgfabbri@hotmail.com )
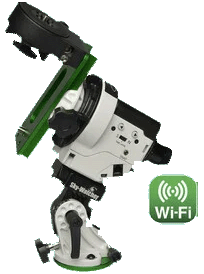
I wrote this program to help in framing a DSO target with my Star Adventurer 2i ( can be used also for no-wifi SA but is not so fast ).
The max. RA speed for the 2i version is abou 50x compared to the 12x for the no-wifi version.
The program can be freely downloaded and installed from this link:
http://www.pgfabbri.it/software/SA/SAManualGoTo.zip
( unzip all files in a temp folder then run setup.exe )
|
|
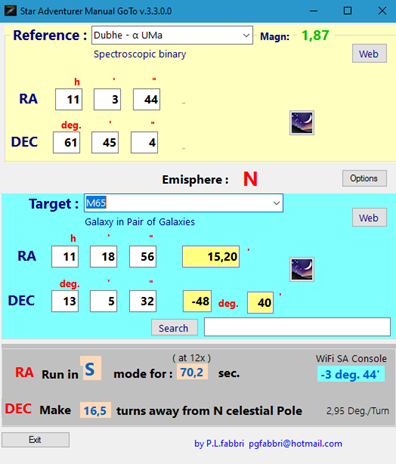
Step 1 Select a Target from the list (110 Messier objects are loaded by default), or search for it by entering the name in the Search box. Once a Target is selected, the 10 closest bright stars (in RA) are found and loaded into the Reference list. Other targets can be searched and saved in your target list.
Step 2 Choose from the list the reference star to aim for according to proximity, magnitude and visibility from the place of observation.. A laser pointer mounted on the hot shoe of DSLR make it easier. Note: If Stellarium server is running, both target and reference can be selected on Stellarium then loaded clicking on the corresponding Stellarium button.
Step 3 Frame the chosen star in the center of the field by releasing both clutches. After that lock the clutches again, and put SA in Sideral mode Tracking.
Step 4 Now follow the instructions in the gray panel below. Make the DEC adjustment first, while tracking. Then, if you have SA 2i, put SA in App mode and connect the SA console.. In Manual Control make the indicated angle correction. If do not have SA 2i press the SA right arrow for the time indicated. The Target should now be in the field of view at least up to focal lengths of 200/300mm. |
|
|
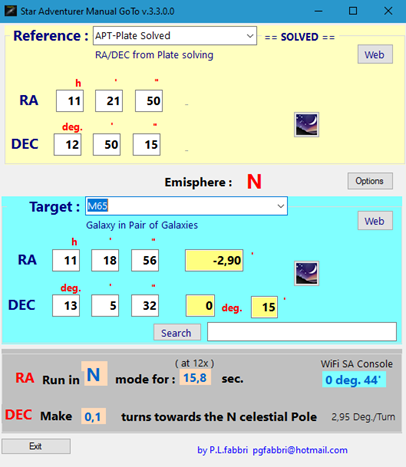
Step 5 ( optional )
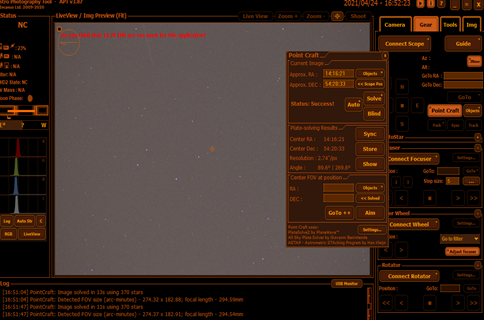
If you have APT connected to Stellarium on the same PC, once you have taken a test image and done the Plate solving, the current position is loaded as reference the corrections to be made are calculated. Proceed as in Step 4
To configure Plate Solving in APT have a look here:
Setting up PlateSolving in Astrophotography Tool (APT) - Discussions - Software - Stargazers Lounge
|
|
|
Configuirng Stellarium Server
Run Stellarium
Select Configuration Window ( or press F2 )
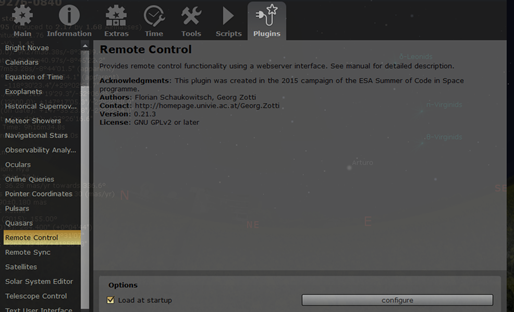
Select Plugins TAB and find Remote Control on the left List
Check “Load on starup” control |
|
|
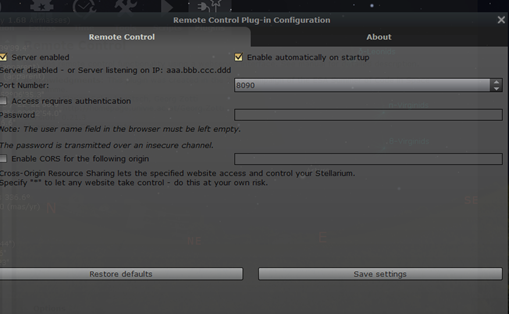
Click on “Configure” button and Check the two options as shown in the fig.
Than Save Settings and close Configuration Window.
Now the Stellarium Server is ready and will be started automatically with the program |
|
|
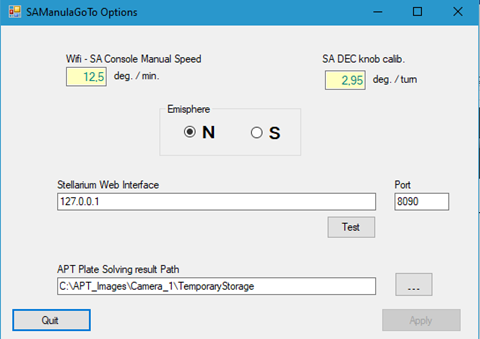
If you click on Options button, some parameters can be changed according on your own calibration or settings. These are the default values.
|
Note:
The coordinates of the 88 brightest stars and the 110 Messier objects were obtained from here: SIMBAD Astronomical Database - CDS (Strasbourg) (u-strasbg.fr)
The program can be freely downloaded and installed from the link:
http://www.pgfabbri.it/software/SA/SAManualGoTo.zip
( unzip all files in a temp folder then run setup.exe )
Comments and suggestions are welcome.
The program was written in Visual Studio 2022 and based on this post A "Manual Goto" method for use with the Star Adventurer mount: Astrophotography Talk Forum Forum: Digital Photography Review (dpreview.com) reported here :
When using a simple mount like the Skywatcher Star Adventurer with a telephoto lens to photograph faint deep sky objects, the problem arises of how to locate the target. Up to now I’ve been using a star hopping technique: estimating the position of the target and taking an image. If the target isn’t visible in the image, I adjust position and try again. This can be both time consuming and frustrating. The problem is acute if the target is so faint that it doesn’t show up in a single exposure (e.g. the Pacman nebula).
I’ve now come up with a manual GoTo method that allows the mount to be moved from a known position to a desired new target position using dead reckoning. It only works if the camera is mounted on the Star Adventurer “Fine Tuning Mounting Assembly” (also called the Dec bracket): the necessary control is lost if the camera is mounted on a ballhead.
The method makes use of the fact that object coordinates in the RA/Dec system are readily available (I get then from the Stellarium app) so that a move from one place to another can be easily described in terms of a change in RA and a change in Dec coordinates. The key is that the motor on the mount only moves the imaging camera in RA, and the control knob on the Dec bracket only moves the camera in Dec. Thus, the necessary RA correction is made with the motor (and the N/S direction slider) and then the necessary Dec correction is made by turning the control knob on the Dec bracket.
The detailed procedure is as follows.
1. Find the coordinates (RA in hours / minutes / seconds; Dec in degrees / arcminutes / arcseconds) of an “easily identifiable star” near the target
2. Find the coordinates (RA, Dec) of the target.
3. Work out how many minutes RA must change to move from the initial star to the target and how many degrees Dec must change to move from the initial star to the target
4. Calculate the direction (S or N on the mount three position slider) and time that the mount needs to run at 12x speed to make the necessary RA correction:
5. Observers in Northern Hemisphere:
1. For every minute increase in RA coordinate, the SA has to run [S, 12x] for 4.62 seconds.
2. For every minute decrease in RA coordinate, the SA has to run [N, 12x] for 5.45 seconds
6. Observers in Southern Hemisphere
1. For every minute increase in RA coordinate, the SA has to run [N, 12x] for 4.62 seconds.
2. For every minute decrease in RA coordinate, the SA has to run [S, 12x] for 5.45 seconds
7. Calculate the number of rotations of the Dec adjustment knob that are needed to make the Dec correction, given that I measured one full rotation of the knob to be equivalent to 2.95 degrees. The knob has 10 ridges on it, so it’s easy to make 1/10 of a turn, or about 0.3 degrees.
1. If Dec needs to increase, the knob must be turned so that the camera turns towards the N celestial pole.
2. If Dec needs to decrease, the knob must be turned so that camera turns away from the N celestial pole
8. Get the mount polar aligned and turn tracking on at the normal 1x rate and direction
9. Centre the camera on the “easily identifiable star”
10. Make the RA adjustment [turn tracker off; set N-S slider appropriately; set speed to 12x; wait the required time; turn tracker off, set N-S slider appropriately for normal tracking; turn normal tracking back on]
11. Make the Dec adjustment
12. Say “Eureka”
I’ve tested the procedure (Northern hemisphere settings) by moving from Elnach to a point between the Jellyfish nebula and the Shoe-buckle cluster. The overall angle between Elnach and the target was 11 degrees and 45 minutes. Initial star (Elnath) is at RA 5h 27m 31s, Dec 28 degrees 37’ 15” and the target was at RA 6h 14m 56s, Dec 23 degrees 28’ 19”. Location after the GoTo move was RA 6h 11m 25s, Dec 23 degrees 40’ 15”.
The aim was to increase RA by 47.5 minutes and it actually increased by 44 minutes (an 8.5% error). The aim was to decrease Dec by 5 degrees and 9 minutes and it actually decreased by 4 degrees and 57 minutes (a 4% error). Overall, these errors mean that the image centre was about 50 arcminutes from the desired target. A 300mm lens on an APS-C camera has an angle of view of about 5 degrees so an error of less than a degree means, with this sensor size and focal length, that the target will be within the field of view after the GoTo move.
I hope that this method may prove useful. Comments are welcome - and if you spot any mistakes in the method, please point them ou